This winter the subject of maintenance projects came up while I was having a beer with our neighbour. When Eyal suggested that he’d like a new cabin floor, initially I turned him down. It’s always good to know your limits and while I enjoy working with wood, I have never claimed to be a carpenter. Moreover, I do not have access to a carpentry shop or big carpentry tools. However, Eyal didn’t give up and in the end I took on the project.
The trick was to find a simple and fairly straight forward way to replace his cabin sole while still retaining a professional look. I had several challenges with this job. First, I needed to find a way to cut and fit the wood floor within the confines of his Endeavour 42. Second was the wood to use. Teak is extremely expensive over here and the teak and holly ply is unavailable. Third I only had basic carpentry tools to work with.
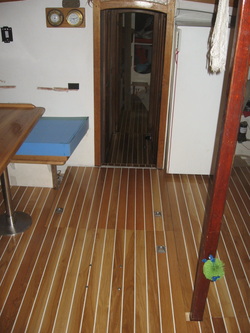
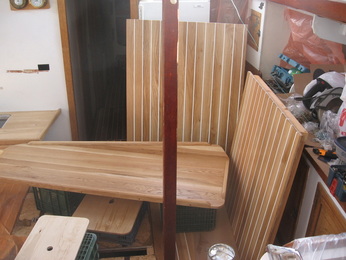
After some time, Eyal settled on oak, and I suggested separating the oak stripes with a white caulking to give a traditional look. On inspection, the boat’s original sole had several opening sections that lifted for access to the engine and the bilge. These openings covered most of the salon floor and gave me a clue to a method that might work. Lifting out one opening “lid”, I noticed that it was made of ply with a covering glued on top. When in place the ply was supported by the boats’ stringers and a wood frame. Maybe we could use the same format for the new floor.
We bought oak lumber and I asked a carpenter to saw it to strips that would be 6mm thick and 5 cm wide. Then I asked him to space and glue the oak strips to 12mm high grade birch ply. I checked that the glue was marine grade. Gluing the strips at the carpentry meant that large presses could be used making a good strong seal. When the glue was dry, the finished ply and oak was brought to the boat and my job began. I laid the ply on the deck and got to work.
Here are the steps to the job:
1.Make patterns from cardboard.
2. Lay the patterns on the ply/oak pieces and trace the edges. Use a jig saw to cut the shapes out.
The trick was to find a simple and fairly straight forward way to replace his cabin sole while still retaining a professional look. I had several challenges with this job. First, I needed to find a way to cut and fit the wood floor within the confines of his Endeavour 42. Second was the wood to use. Teak is extremely expensive over here and the teak and holly ply is unavailable. Third I only had basic carpentry tools to work with.
After some time, Eyal settled on oak, and I suggested separating the oak stripes with a white caulking to give a traditional look. On inspection, the boat’s original sole had several opening sections that lifted for access to the engine and the bilge. These openings covered most of the salon floor and gave me a clue to a method that might work. Lifting out one opening “lid”, I noticed that it was made of ply with a covering glued on top. When in place the ply was supported by the boats’ stringers and a wood frame. Maybe we could use the same format for the new floor.
We bought oak lumber and I asked a carpenter to saw it to strips that would be 6mm thick and 5 cm wide. Then I asked him to space and glue the oak strips to 12mm high grade birch ply. I checked that the glue was marine grade. Gluing the strips at the carpentry meant that large presses could be used making a good strong seal. When the glue was dry, the finished ply and oak was brought to the boat and my job began. I laid the ply on the deck and got to work.
Here are the steps to the job:
1.Make patterns from cardboard.
2. Lay the patterns on the ply/oak pieces and trace the edges. Use a jig saw to cut the shapes out.
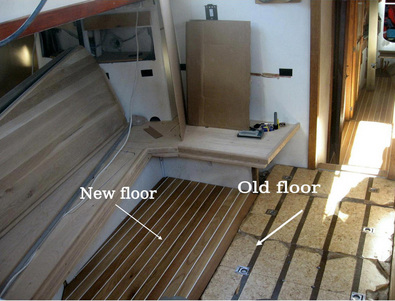
3. Take each piece into the cabin and check for fit. Sand all the edges to a smooth finish. Take the pieces out of the boat, and coat the bottom of the ply as well as all of the edges with a wood sealer. I used a high quality outdoor deck sealer. An epoxy based sealer would be even better. Over the engine compartment it would be a good idea to use a fire retardant paint over the sealer. It is very important to carefully coat the edges, because any moisture will penetrate the edges. Use a few coats.
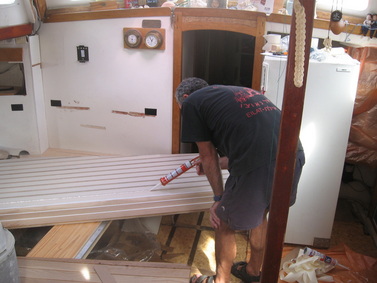
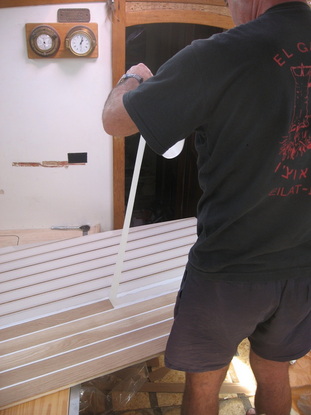
4. Using masking tape, carefully tape the edges of each oak strip. The more careful you are here, the less work you’ll have later. It takes time but just a bit of caulking on the oak can be a bear to remove.
5. Caulk the spaces between the oak strips. I used a marine grade white caulking. Go slowly with a caulking gun, gently pushing the caulking into the grove/space between the oak strips.
6. Work one line at a time and once each line is caulked level it by going over with a smooth straight surface

I began using a simple plastic spatula with a straight edge to do this –the sort plasters use. It worked, but the caulking tends to stick to the plastic and creates a messy job. A local told me to use a piece of potato (No kidding. Robyn thought this was nuts too.) and it was terrific. Slice a medium sized potato in half leaving a sharp edge. Use the sharp edge to level out the caulked seam, pressing it in a little, so that when the caulking cures it will sit ever so slightly under the level of the wood. (You don’t want the caulking to bulge out between the seams.) The potato surface is wet allowing the excess caulking to slide off easily. This creates much less mess and a smoother job. (Feel free to substitute any other seasonal vegetable.)
7. Carefully remove masking tape and move on to continue the same process with the next seam.
8. Let caulking dry for at least 24 hours.
9. Sand the oak surface to a smooth finish. Vacuum wood and wipe with a tack cloth to prepare for your final finish. I used Maritrans MD, a polyurethane based coating. You can also use varnish but just make sure it’s compatible with the caulking compound. When working with Maritrans MD be aware that it is thick like honey and you will need to work slowly gently pulling the coating with your brush to cover the surface. Your reward will be a lovely, THICK, hard varnish type surface that requires only one coat! So the extra effort is worth it.

When choosing your coating it is most important to find a coating that is compatible with your caulking compound. Ask me why I know. Through a long process of trial and error I found out that varnishes were not compatible with the caulking I had used. They contain a solvent that adversely affects the marine caulking. The varnish went on smoothly and I got a terrific finish alright, but each line of caulking would not cure. If you use normal varnish, you will be left with a floor with sticky white stripes. Horrible! In the end I contacted the wholesaler for the caulking compound I used and they recommended Maritrans MD. If only I had done that first!
10. Allow to dry for a minimum of 24 hours and fit into place.
 RSS Feed
