Cabin, anchor and navigation lights all present a big draw on a boat’s batteries. Cruising sailors using battery power, put a fair bit of effort into conserving their power reserves and avoiding dead batteries. Years ago cruising on Free Spirit, we used oil lamps in the cabin when we were anchoring. Underway, we learned to avoid using cabin lights, saving our battery reserves for more important things like navigation lights, bilge pumps and starting the engine.
Not so long ago, LED lights, a new alternative to regular light bulbs appeared on marine store shelves. A LED light draws much fewer amps and provides a much brighter light allowing sailors more free battery hours. Just four of our regular cabin lights draw the same amperage as our refrigerator. Compare that with LEDs, where the draw of ten of these converted LED cabin lights would be less than the amperage draw of one regular cabin light. No question, LEDs would extend our battery power by a few hours.
The problem has been finding affordable marine LED lights. At one point I thought I’d found a good source of affordable led bulbs made in China. Unfortunately when I tried to install the bulbs, I found that they weren’t a correct fit. LED bulbs that are designed for car lights have a single pin while marine led bulbs need to have two. We were back to square one waiting for the price of LEDs to come down.
Then one day not so long ago, I discovered rolls of LED bulbs attached to adhesive strips in a nearby electrical store. While examining them in the shop, I began to picture how we could use them onboard Yofy.
Below is a picture essay of how to upgrade your boat’s cabin light fixtures using these LED strips:
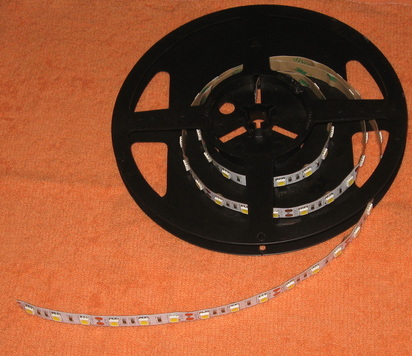
The LED lighting strips are available in different volts and different colours. You will want to buy LED lighting strips that are12 volt -.the voltage suitable for boat cabin fixtures. These LEDS came in red, green, blue, yellow/ white and bright white. For Yofy’s cabin lights, we chose yellow white, wanting a warmer light for the interior and to avoid the blaring white of florescent lights. If you are looking for really bright white lights then the bright white would be for you.
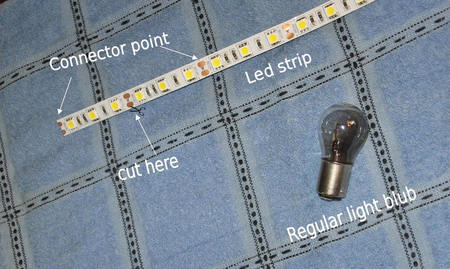
The LED strips are sold by the meter. The strips are marked in increments of three led lights separated by connectors. You can cut anywhere along the strip at the connector points. There are symbols for where to cut as well as marking plus and minus soldering points.
The LED strips are sold by the meter. The strips are marked in increments of three led lights separated by connectors. You can cut anywhere along the strip at the connector points. There are symbols for where to cut as well as marking plus and minus soldering points.
Once you have purchased the LED strips you also will need the following tools to complete this project:
Screw driver
Needle nose pliers
Wire cutters
Wire Stripper
Scissors
Soldering gun
Solder
Optional: Heat Shrink Sleeve and Heat Gun or Cigarette lighter
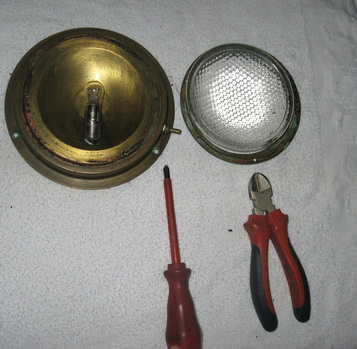
Step 1
Detach cabin fixture from ceiling. Open it up and remove bulb. (I left the bulb socket in place, in case we should ever want to use it in the future, but you can also remove the socket too.)
Screw driver
Needle nose pliers
Wire cutters
Wire Stripper
Scissors
Soldering gun
Solder
Optional: Heat Shrink Sleeve and Heat Gun or Cigarette lighter
Step 1
Detach cabin fixture from ceiling. Open it up and remove bulb. (I left the bulb socket in place, in case we should ever want to use it in the future, but you can also remove the socket too.)
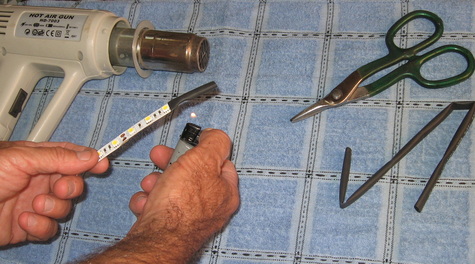
Step 2
Measure the interior space of the fixture, leaving a bit of room for wiring. Cut LED strip according to available space. (Cutting at marked cutting points only – which would mean every three LEDs)
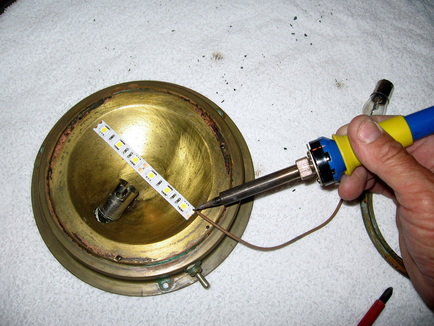
Step 3
Solder wires to plus and minus soldering points. Keep in mind which is which. It is important to have the LED's plus soldered to the fixture’s plus and the minus to the minus. Unlike a regular bulb, LEDs will not work if you wire the wrong way.
Measure the interior space of the fixture, leaving a bit of room for wiring. Cut LED strip according to available space. (Cutting at marked cutting points only – which would mean every three LEDs)
Step 3
Solder wires to plus and minus soldering points. Keep in mind which is which. It is important to have the LED's plus soldered to the fixture’s plus and the minus to the minus. Unlike a regular bulb, LEDs will not work if you wire the wrong way.
Step 4
I like to shrink wrap the ends of the strips for good insulation and a neat finish. Cut a small piece of electrical shrink sleeve and overlap the end of the LED strip. Use a heat gun or cigarette lighter to shrink the plastic wrap neatly to the end.
I like to shrink wrap the ends of the strips for good insulation and a neat finish. Cut a small piece of electrical shrink sleeve and overlap the end of the LED strip. Use a heat gun or cigarette lighter to shrink the plastic wrap neatly to the end.
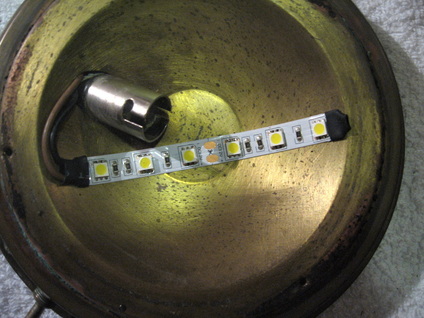
Step 5
Peel off paper backing and stick the strip to the interior of the fixture, lining it up where ever you want it to sit.
Peel off paper backing and stick the strip to the interior of the fixture, lining it up where ever you want it to sit.
Step 6
Feed the wires through to the back of the light fixture – either through an available opening, or one that you drill.
Step 7
If you want to keep the old socket, solder the new wires to the original light bulb socket. (The connectors will be at the back of the fixture. Remember to keep in mind polarity – the plus and minus of the socket)
If you have removed the socket, solder the new wires to the remaining wires that led to the original socket.
Step 8
Reassemble fixture and reinstall on cabin ceiling.
The finished product: We are really pleased with the light. The LEDS provide a brighter, but not aggravating light. Robyn especially likes the light above the galley which is much better for evening galley prep.

 RSS Feed
